The last business meeting you attended made you realize how important it is to use concept maps that allow you to quickly and easily jot down concepts expressed by your colleagues and superiors. Until now, you have always been reluctant to use concept mapping programs, and to be honest, you haven’t even wanted to take the time to learn how they work. If this is the case, know that you can remedy the problem by using a software that, in all likelihood, you already use in the office and often: Microsoft Word.
Yes! The well-known word processing program developed by the Redmond giant can also be used to create concept maps. Let’s be clear though, taking advantage of Word to create concept maps is not as convenient as using specific tools. That being said, if you’re curious to find out how to create concept maps in Word, know that this is the guide for you! In the following paragraphs I’ll explain how to proceed both from a PC, using the desktop version of Word for Windows and macOS, and from the official Word app for smartphones and tablets. On Word Online, which is the free version of Word that can be used through the browser, unfortunately, you can not use the forms through which to create concept maps.
Before we go any further, I’d like to point out that I mainly used Office 2016 for Windows and macOS to write this tutorial. However, the directions you’ll find below are also valid for older versions of Word (from 2007 onwards). That said, we can start: enjoy reading and, above all, good work!
How to make a concept map in Word from PC/Mac

To make a concept map in Word from your PC or Mac, you must first start the famous word processing program on your computer and then use the geometric shapes and connectors that you can call up from the Insert menu. Let’s see in detail how to proceed.
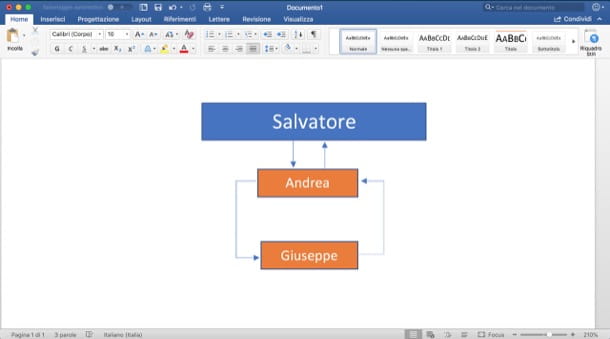
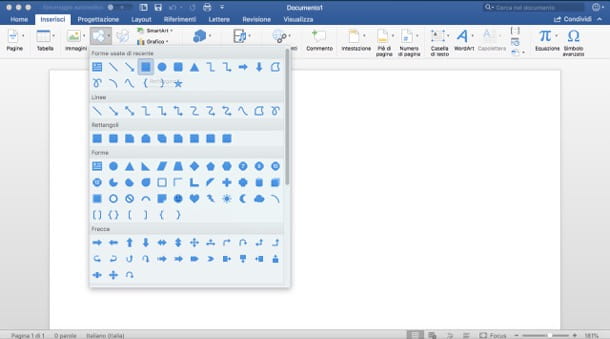
After launching Word, click on the Insert tab at the top, click on the Shapes button (the icon representing the circle, square and rhombus at the top), select the shape you want to use to make the central node (e.g. Rectangle) and draw it on the sheet: then hold down the left mouse button, move the cursor to make the drawing and release it when you have finished making the desired shape.
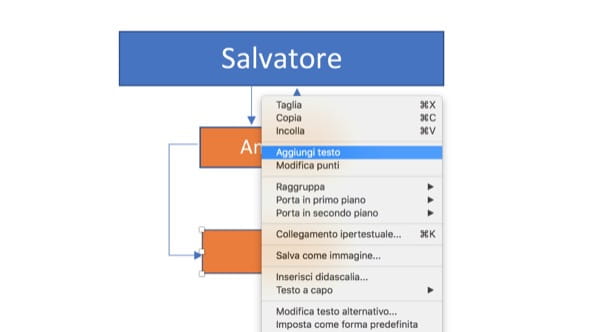
To add text inside the central node you drew, right-click on the inserted shape on the sheet, select Add Text from the context menu and write the word or phrase (you can also format the text using the tools on the Home tab).
Once you have created the central node of the map, add the connectors that will connect it to the other nodes on the map. Click on the Insert tab (if necessary), click on the Shapes button and use one of the connectors in the Lines section (e.g. Connector 5) to connect the central node to the secondary nodes that you will draw following the procedure indicated in the previous lines. To change the appearance of a node, left-click on it and use the small squares and dots that appear on it to change its size and curvature.
To complete the concept map, all you have to do is repeat what I have shown you so far: draw a new node using one of the shapes available in Word and connect it using the connectors and lines available in the program. To add text to the nodes, right-click on them, select Add Text from the context menu, enter the desired word or phrase and you’re done.
If you want, you can also change the appearance of the shapes you used to create your concept map: select one of them, click on the Shape Format button that appears in the toolbar at the top and change the color and appearance of the selected shape using the available options and buttons. As soon as you are satisfied with your work, save it by selecting Save As… from the File menu.
Alternatively, if you want, you can save the concept map as a template and reuse it to create new documents by setting the Word Template (*.dotx) option in the Save As drop-down menu or, if you are using a Mac, by selecting the Save as Template item from the File menu.
How to make a concept map in Word from smartphones and tablets

Would you like to make a concept map in Word directly from your smartphone or tablet? To proceed, you must first install on your Android device (even on alternative stores) iOS/iPadOS the official Word app that, as you may already know, can be used for free on devices with a display size of 10.1″ or less (for larger devices, however, is required to subscribe to Microsoft 365).
Once you have installed and launched the Word app on your smartphone/tablet, log in to your Microsoft account and decide whether to start creating a new document by clicking the New button or edit an existing one by tapping the Open button and then selecting the file from the device memory or from one of the supported cloud storage services.
Once you’ve chosen whether to edit an existing document or create one from scratch, you have another choice to make: draw the concept map using Word’s geometric shapes or draw it by hand using mobile devices’ touch screen technology to your advantage. Let’s see how to proceed in both cases.
To make the concept map using geometric shapes, proceed as follows.
From smartphone – tap on the Home tab located at the bottom left corner of the screen, tap on the Insert tab from the menu that pops up, tap on the Shapes item located at the bottom, select the shape you want to use to draw the main node of the map and resize and move the inserted shape using the dots and squares on its perimeter. Then click on the Insert button at the bottom, select the connector you want to insert in the map choosing one of those in the Lines section and use the dots and squares on the connector to resize it. If you want to add text to the shapes on the sheet, tap on one of them and select Add Text from the menu that opens. Now all you have to do is repeat the above steps to finish the map and you’re done.
From the tablet – click on the Insert button, tap on the Shapes button (the icon with the square and the circle at the top), select the shape you want to use to make the central node of the map and then resize it using the dots and squares placed on its perimeter. Then click on the Insert button in the upper left corner, select the connector you want to use to join the central node to the secondary ones and repeat these operations for all the nodes and connectors you need to complete the work. To insert text into a node, tap on one of the added shapes, click on the Add Text button from the menu that opens and type in the text you want to insert.
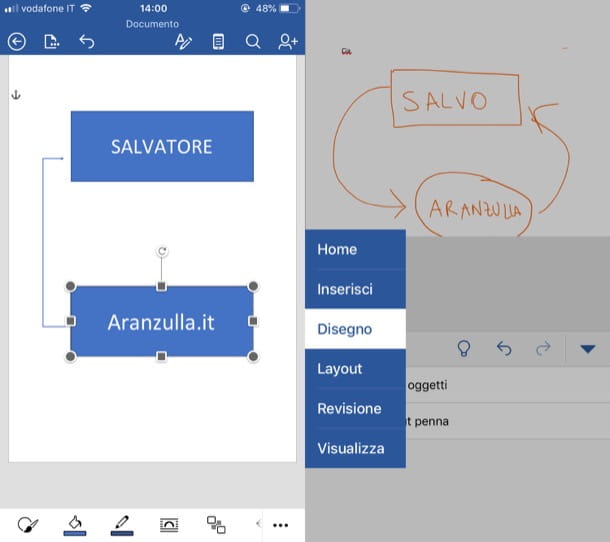
To draw the concept map “by hand” using touch screen technology, proceed as follows.
From smartphone – tap on the Home tab located at the bottom left corner, tap on the Drawing tab from the menu that pops up, tap on the Start Pen Input item, select the pen you want to use and draw the concept map.
From your tablet – click on the Drawing tab located in the top menu, make sure the switch next to the Finger Drawing heading is set to ON, choose the pen you want to use and draw the concept map. It’s as simple as that!
As soon as you’ve finished your work, save it by clicking Save or Export from the File menu (the sheet icon located in the upper left corner).